Posts

Showing posts from March, 2022

Dual Axis Mini CCTV Camera using ESP32 Cam | IOT Based Science Project / Harish Projects

Image
  Purchase Course Video👇 https://harishprojects.graphy.com/ Watch full Detailed Video👇 Project Code👇 #include "esp_camera.h" #include <Arduino.h> #include <WiFi.h> #include <AsyncTCP.h> #include <ESPAsyncWebServer.h> #include <iostream> #include <sstream> #include <ESP32Servo.h> #define PAN_PIN 14 #define TILT_PIN 15 Servo panServo; Servo tiltServo; struct MOTOR_PINS {   int pinEn;     int pinIN1;   int pinIN2;     } ; std::vector<MOTOR_PINS> motorPins = {   { 2 , 12 , 13 } , //RIGHT_MOTOR Pins (EnA, IN1, IN2)   { 2 , 1 , 3 } ,  //LEFT_MOTOR  Pins (EnB, IN3, IN4) } ; #define LIGHT_PIN 4 #define UP 1 #define DOWN 2 #define LEFT 3 #define RIGHT 4 #define STOP 0 #define RIGHT_MOTOR 0 #define LEFT_MOTOR 1 #define FORWARD 1 #define BACKWARD - 1 const int PWMFreq = 1000 ; /* 1 KHz */ const int PWMResolution = 8 ; const int PWMSpeedChannel = 2 ;...

Distance Measuring Device using Ultrasonic sensor | Best Arduino Project | Harish Projects

Image
 Full Making video Link -  https://youtu.be/uc2f4fa_6GQ //Arduino Code// //CODE BY Javier Muñoz Sáez,05/11/2016 questions to javimusama@gmail.com #include <SPI.h> #include <Wire.h> #include <Adafruit_GFX.h> #include <Adafruit_SSD1306.h> #define CommonSenseMetricSystem //#define ImperialNonsenseSystem #define trigPin 13 #define echoPin 12 #define OLED_RESET 4 Adafruit_SSD1306 display ( OLED_RESET ); void setup () { Serial . begin ( 9600 ); pinMode ( trigPin , OUTPUT ); pinMode ( echoPin , INPUT ); display . begin ( SSD1306_SWITCHCAPVCC , 0x3C ); //initialize with the I2C addr 0x3C (128x64) display . clearDisplay (); } void loop () { long duration , distance ; digitalWrite ( trigPin , LOW ); //PULSE ___|---|___ delayMicroseconds ( 2 ); digitalWrite ( trigPin , HIGH ); delayMicroseconds ( 10 ); digitalWrite ( trigPin , LOW ); duration = pulseIn ( echoPin , HIGH ); ...

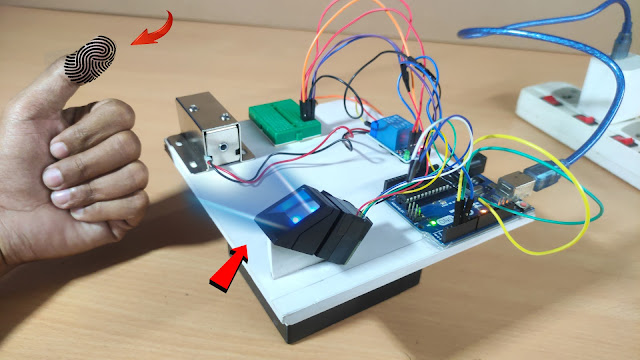
how to make Fingerprint door lock project / fingerprint sensor with arduino uno / Harish Projects

Image
 full making video link -  https://youtu.be/p_5H-3qjmEM //Arduino Code// #include <Adafruit_Fingerprint.h> SoftwareSerial mySerial(2, 3); Adafruit_Fingerprint finger = Adafruit_Fingerprint(&mySerial); #define RELAY_PIN       4 #define ACCESS_DELAY    3000 // Keep lock unlocked for 3 seconds  void setup() {   // set the data rate for the sensor serial port   finger.begin(57600);   delay(5);   if (finger.verifyPassword())    {   }    else    {     while (1) { delay(1); }   }      pinMode(RELAY_PIN, OUTPUT);   digitalWrite(RELAY_PIN, HIGH);   //Switch off relay initially. Relay is LOW level triggered relay so we need to write HIGH. } void loop() {   if ( getFingerPrint() != -1)   {     digitalWrite(RELAY_PIN, LOW);     delay(ACCESS_DELAY);     digitalWrite(RELAY_PIN, HIGH);      }...

How to make Joystick Control Robot With servo Motor | Best Arduino Project / Harish Projects

Image
 Full video link -  https://youtu.be/YTpgQ6iNrPo //Arduino code// #include <Servo.h> bool repeatePlaying = false; /* Repeatedly is running recorded cycle */ int delayBetweenCycles = 2000; /* Delay between cycles */ int basePin = 11;       /* Base servo */ int shoulderPin = 10;   /* Shoulder servo */ int elbowPin = 9;       /* Elbow servo */ int gripperPin = 6;     /* Gripper servo */ int xdirPin = 0;        /* Base - joystick1*/ int ydirPin = 1;        /* Shoulder - joystick1 */ int zdirPin = 3;        /* Elbow - joystick2 */ int gdirPin = 2;        /* Gripper - joystick2 */ //int pinRecord = A4;     /* Button record - backward compatibility */ //int pinPlay = A5;       /* Button play  - backward compatibility */ int pinRecord = PD2;     /* Button record - recommended (A4 is...

How to make Joystick control Robot / Dc motor with motor Driver using Arduino / Harish Projects

Image
 Full video Link -  https://youtu.be/zmBf7VJ6HIU Arduino Code #define enA 9 #define in1 4 #define in2 5 #define enB 10 #define in3 6 #define in4 7 int motorSpeedA = 0; int motorSpeedB = 0; void setup() {   pinMode(enA, OUTPUT);   pinMode(enB, OUTPUT);   pinMode(in1, OUTPUT);   pinMode(in2, OUTPUT);   pinMode(in3, OUTPUT);   pinMode(in4, OUTPUT); } void loop() {   int xAxis = analogRead(A0); // Read Joysticks X-axis   int yAxis = analogRead(A1); // Read Joysticks Y-axis   // Y-axis used for forward and backward control   if (yAxis < 470) {     // Set Motor A backward     digitalWrite(in1, HIGH);     digitalWrite(in2, LOW);     // Set Motor B backward     digitalWrite(in3, HIGH);     digitalWrite(in4, LOW);     // Convert the declining Y-axis readings for going backward from 470 to 0 into 0 to 255 value for the PWM signal for increasing the motor speed ...