ProjectDescription
Today, social distancing has become a norm in any social interaction we have due to the increasing threat of the spread of Covid-19. There are many innovations that have been created to help combat and reduce the spread of the deadly disease, not just with other types of devices but using the power of Arduino as well. This can be seen in other projects across the website such as a Hand wash timer or an automatic hand sanitizer dispenser.
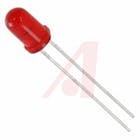
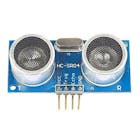
This project created aims to help reduce the potential spread of the disease by utilizing an ultrasonic distance sensor. The sensor measures the distance between itself and the object in front of it, whether it be an object or a person. If something comes within 1.5m of the sensor, a buzzer sounds, and an LED lights up, therefore signaling that someone or something is within the range of social distancing.
This Arduino device can be used in real-life situations. For example, if you're in a queue at a coffee shop or at a train station. I have included a hyperlink for a simple 3D rendering of the proposed housing via TinkerCad. With the housing, you could clip this product on your belt or just hold it.
Overall, as individuals, we need to start adapting social distancing more and this is exactly what this device promotes through its visual and audio aids via the buzzer and LED.
//ProcedureToCreateProduct//
1. Plugin Arduino and set up the breadboard And Ultrasonic Sensor, with the Trigpin on pin 9 and the echo pin on 10. The led pin is on 13.
2. Connect the ultrasonic sensor, the breadboard with the LED, and the buzzer to the Arduino, with the buzzer on pin 2.
3. Now Upload Code To Board Via Arduino IDE which is in the software section, then you’re Done. Watch the COM4 serial monitor for distance outputs in Cm if you desire. The serial monitor is viewed from the button search-looking button in the top right corner of the app after the code has been uploaded.
Youtube Link Demonstrating The Product:
Contact us for support:
instagram: https://www.instagram.com/harishchoudhary70/
Project Diagram:
Arduino code:
const int trigPin = 9; //pin for sensor, trig pin transmits signal to object in front of it
const int echoPin = 10; //pin for sensor, echo pin receives the signal the object reflects and therefore the distance is measured
const int ledPin = 13; //led pin on arduino
const int buzzPin = 2; //buzzer pin on arduino
long duration; //distance variable
int distance;
void setup()                      //YouTube - Harish Projects
{                                 //Instagram - Harish Projects
Serial.begin(9600);
pinMode(trigPin, OUTPUT);
pinMode(echoPin, INPUT);
pinMode(ledPin, OUTPUT);
pinMode(buzzPin, OUTPUT);
}
void loop() {
digitalWrite(trigPin, LOW);
delayMicroseconds(2);
digitalWrite(trigPin, HIGH); //trigpin's output pulse
delayMicroseconds(1000);
digitalWrite(trigPin, LOW);
duration = pulseIn(echoPin, HIGH); //calibrate echo pin's pulse input
distance= duration*0.034/2; // distanceCm is half the duration multiplied by 0.034
Serial.println("Distance: "); //print to serial monitor
Serial.println(distance); //print distance in Cm to the serial monitor
delay(500); //so you don't get overloaded by serial monitor outputs


if (distance <= 150 && distance >= 0) { //if distance from sensor to object is less than 150cm and more than 0

digitalWrite(ledPin, HIGH); //light led
digitalWrite(buzzPin, HIGH); //buzz
tone(2, 500, 120); //so we can hear a sound from the buzzer that isn't inaudible
//buzz and light LED
} else {
//dont buzz or light LED
digitalWrite(ledPin, LOW); //don't light led
digitalWrite(buzzPin, LOW); //don't buzz
}
}

_ztBMuBhMHo.jpg?auto=compress%2Cformat&w=140&h=140&fit=fill&bg=ffffff)


Comments